[phpBB Debug] PHP Warning: in file /includes/bbcode.php on line 483: preg_replace(): The /e modifier is no longer supported, use preg_replace_callback instead
[phpBB Debug] PHP Warning: in file /includes/bbcode.php on line 483: preg_replace(): The /e modifier is no longer supported, use preg_replace_callback instead
[phpBB Debug] PHP Warning: in file /includes/bbcode.php on line 483: preg_replace(): The /e modifier is no longer supported, use preg_replace_callback instead
[phpBB Debug] PHP Warning: in file /includes/bbcode.php on line 483: preg_replace(): The /e modifier is no longer supported, use preg_replace_callback instead
[phpBB Debug] PHP Warning: in file /includes/bbcode.php on line 483: preg_replace(): The /e modifier is no longer supported, use preg_replace_callback instead
[phpBB Debug] PHP Warning: in file /includes/bbcode.php on line 483: preg_replace(): The /e modifier is no longer supported, use preg_replace_callback instead
[phpBB Debug] PHP Warning: in file /includes/bbcode.php on line 483: preg_replace(): The /e modifier is no longer supported, use preg_replace_callback instead
[phpBB Debug] PHP Warning: in file /includes/bbcode.php on line 483: preg_replace(): The /e modifier is no longer supported, use preg_replace_callback instead
[phpBB Debug] PHP Warning: in file /includes/bbcode.php on line 483: preg_replace(): The /e modifier is no longer supported, use preg_replace_callback instead
[phpBB Debug] PHP Warning: in file /includes/bbcode.php on line 483: preg_replace(): The /e modifier is no longer supported, use preg_replace_callback instead
[phpBB Debug] PHP Warning: in file /includes/bbcode.php on line 483: preg_replace(): The /e modifier is no longer supported, use preg_replace_callback instead
[phpBB Debug] PHP Warning: in file /includes/bbcode.php on line 483: preg_replace(): The /e modifier is no longer supported, use preg_replace_callback instead
[phpBB Debug] PHP Warning: in file /includes/bbcode.php on line 483: preg_replace(): The /e modifier is no longer supported, use preg_replace_callback instead
[phpBB Debug] PHP Warning: in file /includes/bbcode.php on line 483: preg_replace(): The /e modifier is no longer supported, use preg_replace_callback instead
[phpBB Debug] PHP Warning: in file /includes/bbcode.php on line 483: preg_replace(): The /e modifier is no longer supported, use preg_replace_callback instead
[phpBB Debug] PHP Warning: in file /includes/bbcode.php on line 483: preg_replace(): The /e modifier is no longer supported, use preg_replace_callback instead
[phpBB Debug] PHP Warning: in file /includes/bbcode.php on line 483: preg_replace(): The /e modifier is no longer supported, use preg_replace_callback instead
[phpBB Debug] PHP Warning: in file /includes/bbcode.php on line 483: preg_replace(): The /e modifier is no longer supported, use preg_replace_callback instead
[phpBB Debug] PHP Warning: in file /includes/bbcode.php on line 483: preg_replace(): The /e modifier is no longer supported, use preg_replace_callback instead
[phpBB Debug] PHP Warning: in file /includes/bbcode.php on line 483: preg_replace(): The /e modifier is no longer supported, use preg_replace_callback instead
[phpBB Debug] PHP Warning: in file /includes/bbcode.php on line 483: preg_replace(): The /e modifier is no longer supported, use preg_replace_callback instead
[phpBB Debug] PHP Warning: in file /includes/bbcode.php on line 483: preg_replace(): The /e modifier is no longer supported, use preg_replace_callback instead
[phpBB Debug] PHP Warning: in file /includes/bbcode.php on line 483: preg_replace(): The /e modifier is no longer supported, use preg_replace_callback instead
[phpBB Debug] PHP Warning: in file /includes/bbcode.php on line 483: preg_replace(): The /e modifier is no longer supported, use preg_replace_callback instead
[phpBB Debug] PHP Warning: in file /includes/bbcode.php on line 483: preg_replace(): The /e modifier is no longer supported, use preg_replace_callback instead
[phpBB Debug] PHP Warning: in file /includes/bbcode.php on line 483: preg_replace(): The /e modifier is no longer supported, use preg_replace_callback instead
[phpBB Debug] PHP Warning: in file /includes/functions.php on line 4586: Cannot modify header information - headers already sent by (output started at /includes/functions.php:3765)
[phpBB Debug] PHP Warning: in file /includes/functions.php on line 4588: Cannot modify header information - headers already sent by (output started at /includes/functions.php:3765)
[phpBB Debug] PHP Warning: in file /includes/functions.php on line 4589: Cannot modify header information - headers already sent by (output started at /includes/functions.php:3765)
[phpBB Debug] PHP Warning: in file /includes/functions.php on line 4590: Cannot modify header information - headers already sent by (output started at /includes/functions.php:3765)
Tascione • View topic - make your own steady rest

make your own steady rest

Have a good repair tip for the rest of us? Please post it here.

Welcome to the forum!
All visitors are welcome to view topics and posts.
MEMBERSHIP AND POSTING IS RESERVED FOR TASCIONE COURSE MEMBERS ONLY... http://www.tascione.com

Moderators: willofiam, Bob Tascione

make your own steady rest

Postby willofiam » Tue Jul 10, 2012 3:14 pm

Hi everyone, I had made something like this in the past and thought I would wait for the real thing if I could find one. One had come up on eBay and the price went sky high so I decided to make another one. I am sure there are many different and better ways to accomplish this task but I hope this motivates you as I imagine I saved more than a $100.00 and briefly explain how I went about making this steady rest.I found all the parts at the local hardware store for about $15.00
DSCN2738_01.JPG
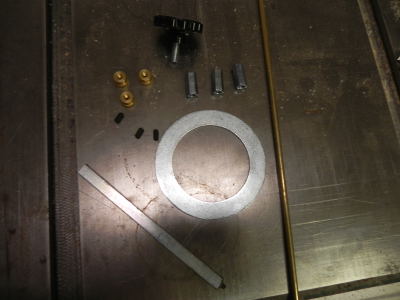
A pack of 10-24 couplers, narrow rim machinery bushing 2 1/4id & 3 1/4 od, brass knurled knobs, length of 3/16 brass rod, 1/4 x 1/4 steel stock, set screws I didnt use, a knob,
DSCN2738_01.JPG (36.46 KiB) Viewed 11396 times
I drilled out the threads on the couplers with 3/16 drill bit making sure the brass rod would snugly slide thru. I didnt get a picture of this but I used a large hex nut centered in the steel ring which gave me a pretty good reference to the angles, if you use a flat face of the brass rod thru the housing you just made then the hex nut gives you 3 of the six sides for reference, hope that makes sense :roll: . I used a silver solder to place the couplers, thinking that will allow me to move them when setting up at the lathe
DSCN2739_01.JPG
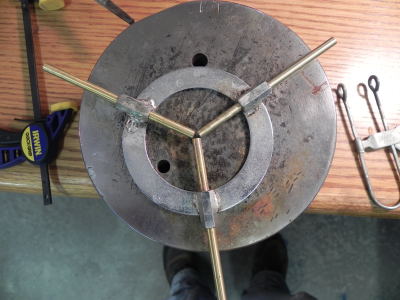
using a large hex nut helped find the proper angles, comes out pretty close, silver solder allows for adjusting later
DSCN2739_01.JPG (45.08 KiB) Viewed 11396 times
using a #29 drill bit and a 8-32nds tap I drilled thru the coupler and the metal ring, I wanted the threads to go thru both. I changed my mind on how I was going to do the knurled knobs that hold the brass rods and ended up just screwing in a machine screw tight and punching the backside of the brass knob to hold the screw. I then found some metal in the shop to make the base. my idea was to have the base finished so I could tighten it onto the lathe bed, adjust if needed, line everything up and clamp together to a good center. a simple angle bracket and a 1/4 x 1/4 piece of steel sized in width for my lathe then brazed together, a nut on the top with a through hole to it from the bottom for a knob, using the lathe and a small piece of steel rod I clamped the top and bottom together, this is when I was able to true up the brass rods to center.
DSCN2761_01.JPG
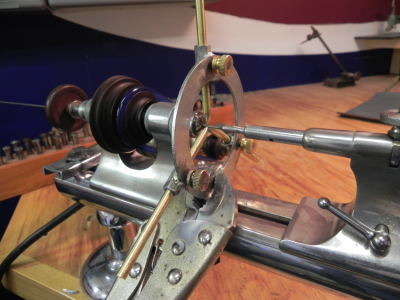
chucked up in the lathe and final adjustment made
DSCN2761_01.JPG (46.7 KiB) Viewed 11396 times
I then brazed the bottom to the top, I messed up as it melted the solder that was holding the couplers on, luckily they stayed pretty close and I readjusted them again, I think I would do that a little different next time. Chucked up the brass rods and put a little detail on them, by the way I used the 3/16 rod because In wanted to be able to use wood dowel in this also..
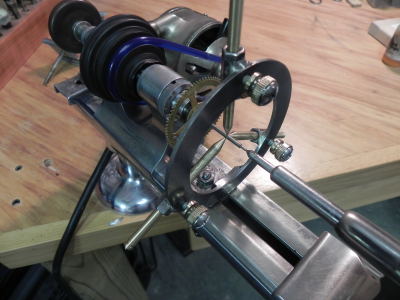
DSCN2762_01.JPG
and whalla
DSCN2762_01.JPG (46.15 KiB) Viewed 11396 times
if anyone has some better ideas please add to this. Thank you, William
Have a great day, William
User avatar
willofiam
 
Posts: 1435
Joined: Fri Feb 10, 2012 5:47 pm

Re: make your own steady rest

Postby Arutha » Wed Jul 11, 2012 7:21 am

That there William is an awesome idea! I have been looking for something similar myself. Give yourself a massive pat on the back from me :)
Arutha
 
Posts: 1521
Joined: Mon Dec 13, 2010 4:11 pm

Re: make your own steady rest

Postby Bob Tascione » Wed Jul 11, 2012 8:36 am

That looks great William!
I'll bet this is gonna be a very helpful post for many of us.
Thanks!

Bob
User avatar
Bob Tascione
 
Posts: 1545
Joined: Fri Apr 30, 2010 1:55 pm

Re: make your own steady rest

Postby digitaltripper » Sat Dec 01, 2012 12:08 pm

Ok William, I need one...How much?

Jim
User avatar
digitaltripper
 
Posts: 102
Joined: Sat Apr 07, 2012 1:47 pm

Re: make your own steady rest

Postby willofiam » Sun Dec 02, 2012 9:30 am

Hey Jim, who am I to make this for you, (I am flattered at the proposal) :D , I am sure you would be able to make one much better!!!! ;) I would think your cost for parts would be about $10-$15. One thing I am thinking about is to have it attach to the lathe quicker instead of using a threaded rod, possibly some kind of fold over cam to pull it tight to the bed of the lathe???? I would appreciate your ideas. William
Have a great day, William
User avatar
willofiam
 
Posts: 1435
Joined: Fri Feb 10, 2012 5:47 pm

Re: make your own steady rest

Postby showaddywaddy » Wed Jan 23, 2013 5:21 pm

i will try that very good i have a problem i,m a new gut on the form i cant fiend the way to post can you tell me how its done showaddywaddy
showaddywaddy
 
Posts: 45
Joined: Tue Dec 25, 2012 11:18 am

Re: make your own steady rest

Postby Arutha » Fri Jan 25, 2013 3:11 am

If you look at the general discussion board you will see a small white box with pink writing saying "New Topic". Just click on that and it will start you a new thread. Any problems please let us know :)
Good luck,
Paul.
Arutha
 
Posts: 1521
Joined: Mon Dec 13, 2010 4:11 pm

Re: make your own steady rest

Postby showaddywaddy » Sat Jan 26, 2013 6:08 pm

thanks paul
showaddywaddy
 
Posts: 45
Joined: Tue Dec 25, 2012 11:18 am

Re: make your own steady rest

Postby Dave Booth » Thu Mar 17, 2016 6:46 pm

Everyone has his own method of skinning a cat. Here is a steady rest I made several years ago, because the ones on eBay were ridiculously expensive. This one is made to fit my 8mm Peerless lathe. The basis is a piece of 3/16" thick aluminum plate, which I got from a shop in Baltimore that makes prosthetic limbs and braces. They have a lot of smallish, odd sized pieces of scrap, and were willing to part with a shoebox full for $5.00. (I also bought some stainless steel flat and bar stock from them for a similar price.) When I made miner, I still had a Unimat 3, so it was a simple matter to mill slots, but I used the same method as Will to lay them out - I had a 3/4" hex nut that came from who knows where (I never toss anything out, until I am sure I will want it the next day - <grin>) Cutting and fitting the bottom to my Peerless ways was one of those "cuss and fit" projects; I'm sure some of you machinist types could figure out a way to measure and lay it out, though. If you look carefully at the photo, you will see I number stamped the rests and the slots, because my milling setup was not as rigid as it probably should have been. (If I had it to do over, I'd run the mill at a higher RPM, and feed it more slowly) Each rest was individually filed to fit that particular slot. They don't show up well in the photo, but each rest also has a slot cut for the mounting screw, so that I can adjust it. The screws are #4-40. I drilled and tapped the bottom for #8-32 threaded rod. Fender washers and a wing nut secure it to the ways. (I use a pair of fender washers, because a single one has a little too much flex to make me comfortable.)

Incidentally, when machining aluminum, kerosene is your friend. Except I use a little fuel oil robbed from my furnace, because it is an easy matter to go down in the basement and open the bleed valve on the furnace pump to steal a cup or two. If you haven a handy supply of either of those, go to your local automobile filling station, and buy a gallon of Diesel fuel - it is all essentially the same stuff. Kerosene is also great cutting oil to use for touching up your pivot burnisher, and your screwdrivers and gravers.

I will make up another post, wherein I talk about cutting lubricants, and which ones to use for what metals, and where you can get the stuff cheaply.
Attachments
Stady rest 01.JPG
Stady rest 01.JPG (24.59 KiB) Viewed 9385 times
Dave Booth
 
Posts: 56
Joined: Fri Feb 05, 2016 10:45 pm


Return to Hints, Tips and Tricks

Who is online

Users browsing this forum: No registered users and 2 guests

cron