[phpBB Debug] PHP Warning: in file /includes/bbcode.php on line 483: preg_replace(): The /e modifier is no longer supported, use preg_replace_callback instead
[phpBB Debug] PHP Warning: in file /includes/bbcode.php on line 483: preg_replace(): The /e modifier is no longer supported, use preg_replace_callback instead
[phpBB Debug] PHP Warning: in file /includes/bbcode.php on line 483: preg_replace(): The /e modifier is no longer supported, use preg_replace_callback instead
[phpBB Debug] PHP Warning: in file /includes/bbcode.php on line 483: preg_replace(): The /e modifier is no longer supported, use preg_replace_callback instead
[phpBB Debug] PHP Warning: in file /includes/bbcode.php on line 483: preg_replace(): The /e modifier is no longer supported, use preg_replace_callback instead
[phpBB Debug] PHP Warning: in file /includes/bbcode.php on line 483: preg_replace(): The /e modifier is no longer supported, use preg_replace_callback instead
[phpBB Debug] PHP Warning: in file /includes/bbcode.php on line 483: preg_replace(): The /e modifier is no longer supported, use preg_replace_callback instead
[phpBB Debug] PHP Warning: in file /includes/bbcode.php on line 483: preg_replace(): The /e modifier is no longer supported, use preg_replace_callback instead
[phpBB Debug] PHP Warning: in file /includes/bbcode.php on line 483: preg_replace(): The /e modifier is no longer supported, use preg_replace_callback instead
[phpBB Debug] PHP Warning: in file /includes/bbcode.php on line 483: preg_replace(): The /e modifier is no longer supported, use preg_replace_callback instead
[phpBB Debug] PHP Warning: in file /includes/bbcode.php on line 483: preg_replace(): The /e modifier is no longer supported, use preg_replace_callback instead
[phpBB Debug] PHP Warning: in file /includes/bbcode.php on line 483: preg_replace(): The /e modifier is no longer supported, use preg_replace_callback instead
[phpBB Debug] PHP Warning: in file /includes/bbcode.php on line 483: preg_replace(): The /e modifier is no longer supported, use preg_replace_callback instead
[phpBB Debug] PHP Warning: in file /includes/bbcode.php on line 483: preg_replace(): The /e modifier is no longer supported, use preg_replace_callback instead
[phpBB Debug] PHP Warning: in file /includes/bbcode.php on line 483: preg_replace(): The /e modifier is no longer supported, use preg_replace_callback instead
[phpBB Debug] PHP Warning: in file /includes/bbcode.php on line 483: preg_replace(): The /e modifier is no longer supported, use preg_replace_callback instead
[phpBB Debug] PHP Warning: in file /includes/bbcode.php on line 483: preg_replace(): The /e modifier is no longer supported, use preg_replace_callback instead
[phpBB Debug] PHP Warning: in file /includes/bbcode.php on line 483: preg_replace(): The /e modifier is no longer supported, use preg_replace_callback instead
[phpBB Debug] PHP Warning: in file /includes/bbcode.php on line 483: preg_replace(): The /e modifier is no longer supported, use preg_replace_callback instead
[phpBB Debug] PHP Warning: in file /includes/bbcode.php on line 483: preg_replace(): The /e modifier is no longer supported, use preg_replace_callback instead
[phpBB Debug] PHP Warning: in file /includes/bbcode.php on line 483: preg_replace(): The /e modifier is no longer supported, use preg_replace_callback instead
[phpBB Debug] PHP Warning: in file /includes/bbcode.php on line 483: preg_replace(): The /e modifier is no longer supported, use preg_replace_callback instead
[phpBB Debug] PHP Warning: in file /includes/bbcode.php on line 483: preg_replace(): The /e modifier is no longer supported, use preg_replace_callback instead
[phpBB Debug] PHP Warning: in file /includes/bbcode.php on line 483: preg_replace(): The /e modifier is no longer supported, use preg_replace_callback instead
[phpBB Debug] PHP Warning: in file /includes/bbcode.php on line 483: preg_replace(): The /e modifier is no longer supported, use preg_replace_callback instead
[phpBB Debug] PHP Warning: in file /includes/bbcode.php on line 483: preg_replace(): The /e modifier is no longer supported, use preg_replace_callback instead
[phpBB Debug] PHP Warning: in file /includes/bbcode.php on line 112: preg_replace(): The /e modifier is no longer supported, use preg_replace_callback instead
[phpBB Debug] PHP Warning: in file /includes/functions.php on line 4586: Cannot modify header information - headers already sent by (output started at /includes/functions.php:3765)
[phpBB Debug] PHP Warning: in file /includes/functions.php on line 4588: Cannot modify header information - headers already sent by (output started at /includes/functions.php:3765)
[phpBB Debug] PHP Warning: in file /includes/functions.php on line 4589: Cannot modify header information - headers already sent by (output started at /includes/functions.php:3765)
[phpBB Debug] PHP Warning: in file /includes/functions.php on line 4590: Cannot modify header information - headers already sent by (output started at /includes/functions.php:3765)
Tascione • View topic - Building a Grasshopper Escapement Skeleton Clock

Building a Grasshopper Escapement Skeleton Clock

The Clock 'Making' Forum is dedicated to clock parts fabrication and clock building techniques. All members are welcome and encouraged to share their related projects, ideas, comments and questions. Please use the "General Forum" for all repair questions or other topics not related to the actual making of parts.

All visitors are welcome to view topics and posts.
MEMBERSHIP AND POSTING IS RESERVED FOR TASCIONE COURSE MEMBERS ONLY... http://www.tascione.com

Moderators: willofiam, Bob Tascione

Building a Grasshopper Escapement Skeleton Clock

Postby willofiam » Fri Dec 23, 2016 11:56 am

Well...I finally started to build a clock. After much time debating on whether to design one or use a book to follow I found myself thinking it would be a good learning process to go thru a book, let alone save some hair on my balding head :roll: . Though I have found this a much more difficult task than I first thought, following someones processes and techniques...I believe this was the right direction to go and have been learning alot while putting my own twists into it. The book was written by W.R. Smith is called "How to make a grasshopper skeleton clock" and can be found online for a very reasonable price.

This will be a ongoing thread until the clock is finished. I look forward to your input, questions and suggestions so feel free to interject at anytime.

To start I ordered the materials needed. For the brass I decided to use c353 engravers brass for the plates and wheels though the thickest sheet I could find was 3/16" thick which is thick enough for most parts, other parts I am using c360 half hard brass round bar stock. I have not been able to find c353 in round bar stock nor have I found c360 in sheet stock :roll: ....ssssoooo I am mixing the 2 throughout the build. The steel parts will be made out of O-1 tool steel and other miscellaneous mild steels as needed.
Have a great day, William
User avatar
willofiam
 
Posts: 1435
Joined: Fri Feb 10, 2012 5:47 pm

Re: Building a Grasshopper Escapement Skeleton Clock

Postby willofiam » Fri Dec 23, 2016 12:20 pm

In the beginning...the plates were cut out. :D I used a band-saw to rough out the shape.
DSCN8948.JPG
DSCN8948.JPG (209.39 KiB) Viewed 31898 times
DSCN8950.JPG
Seemed to be the best way to layout and save a larger area of material for future use.
DSCN8950.JPG (219.31 KiB) Viewed 31898 times
DSCN8949.JPG
tape on the back to help prevent deep scratches
DSCN8949.JPG (203.83 KiB) Viewed 31898 times
DSCN8951.JPG
DSCN8951.JPG (197.38 KiB) Viewed 31898 times
Have a great day, William
User avatar
willofiam
 
Posts: 1435
Joined: Fri Feb 10, 2012 5:47 pm

Re: Building a Grasshopper Escapement Skeleton Clock

Postby willofiam » Fri Dec 23, 2016 12:43 pm

Once roughed out the front plate is drilled and reamed at the pillar hole locations using "Elmer" the milling machine. O.K....maybe Im goofy naming my milling machine....Elmer was the gentleman that sold me his 1958 Bridgeport. He was the second owner using it in his basement for 48 years as a tool and die maker, machining beautiful and wonderful things. He stops over once in awhile to make sure I am taking care of it....how cool is that... :)

At first I didnt want to use the locating holes for the plates described in the book since they could possibly be seen when the clock is finished, I changed my mind later seeing that they would be helpful in several other processes. The back plate is drilled and threaded in the same locations. The 2 plates could then be bolted together, cut and shaped.
DSCN8954.JPG
DSCN8954.JPG (212.06 KiB) Viewed 31898 times
DSCN8955.JPG
DSCN8955.JPG (205.6 KiB) Viewed 31898 times
DSCN8956.JPG
Using the band-saw to get close to the lines. All I had was a 3/8" wide blade, a 1/4" wide blade would have worked better.
DSCN8956.JPG (223.45 KiB) Viewed 31898 times
Have a great day, William
User avatar
willofiam
 
Posts: 1435
Joined: Fri Feb 10, 2012 5:47 pm

Re: Building a Grasshopper Escapement Skeleton Clock

Postby willofiam » Fri Dec 23, 2016 4:29 pm

O.K. using the scroll-saw (an old Atlas 24" variable speed) and piercing saw with a #8 blade, I cut and trimmed the plates close to the final form. On this clock the front plate has the 2 side "wings" that will hold the dial in place, the back plate will have them cut off. In hindsight I may have liked using layout blue and a light scribe line to draw out the dimensions and design....just me being a bit picky :roll: the paper template lines were rather wide and I felt a bit inaccurate...next time, right?
DSCN8994.JPG
DSCN8994.JPG (209.59 KiB) Viewed 31895 times
DSCN8995.JPG
DSCN8995.JPG (220.18 KiB) Viewed 31895 times
DSCN8997.JPG
DSCN8997.JPG (225.06 KiB) Viewed 31895 times
DSCN8996.JPG
DSCN8996.JPG (212.4 KiB) Viewed 31895 times
Have a great day, William
User avatar
willofiam
 
Posts: 1435
Joined: Fri Feb 10, 2012 5:47 pm

Re: Building a Grasshopper Escapement Skeleton Clock

Postby willofiam » Fri Dec 23, 2016 4:38 pm

Moving on to the final dimensions of the plates. I used a Milwaukee die filler, and an assortment of hand files. In photo # 2 notice the hardened steel filing guides, easily turned and hardened for the round areas, sure makes for a easy, nice, round piece when finished. All the final filing and polishing will be done near the end of the project.
DSCN8991.JPG
DSCN8991.JPG (216.36 KiB) Viewed 31895 times
DSCN8992.JPG
DSCN8992.JPG (203.18 KiB) Viewed 31895 times
DSCN8998.JPG
DSCN8998.JPG (211.37 KiB) Viewed 31895 times
Have a great day, William
User avatar
willofiam
 
Posts: 1435
Joined: Fri Feb 10, 2012 5:47 pm

Re: Building a Grasshopper Escapement Skeleton Clock

Postby willofiam » Wed Dec 28, 2016 2:50 pm

Alright, next will be making the pillars, feet, washers and screws for the pillars. Using the c360 brass round stock and o-1 tool steel.
DSCN8999.JPG
DSCN8999.JPG (209.46 KiB) Viewed 31886 times
DSCN9001.JPG
DSCN9001.JPG (219.84 KiB) Viewed 31886 times


Now this piece of brass may look like a mess :roll: thats my train of thought and believe it or not....I do have a plan

DSCN9002.JPG
DSCN9002.JPG (223.81 KiB) Viewed 31886 times


Not giving away all my secrets.....I used Elmer the mill, a Ellis dividing head and a endmill the size I needed for the idea. You may already have guessed what I am doing, if not stay tuned.

DSCN9006.JPG
DSCN9006.JPG (221.22 KiB) Viewed 31886 times
Have a great day, William
User avatar
willofiam
 
Posts: 1435
Joined: Fri Feb 10, 2012 5:47 pm

Re: Building a Grasshopper Escapement Skeleton Clock

Postby willofiam » Wed Dec 28, 2016 3:05 pm

Wanting a 2 tone style of finish I did a bit of brainstorming about how I would do that, thru experimenting on scrap and making some other oddball items not related to clocks gave me some ideas...there I go thinking again :roll: ...

Running the mill at 1115 rpm's and turning the crank on the dividing head while feeding the endmill into the side of the brass piece I was able to create what I was imagining in my head and had drawn on paper.

DSCN9007.JPG
DSCN9007.JPG (211.51 KiB) Viewed 31886 times
DSCN9008.JPG
DSCN9008.JPG (216.17 KiB) Viewed 31886 times
DSCN9009.JPG
DSCN9009.JPG (214.95 KiB) Viewed 31886 times


Notice the effect leaving the machining marks have when reflecting the light. I like....
Have a great day, William
User avatar
willofiam
 
Posts: 1435
Joined: Fri Feb 10, 2012 5:47 pm

Re: Building a Grasshopper Escapement Skeleton Clock

Postby willofiam » Wed Dec 28, 2016 3:16 pm

By grinding a peice of hss to a specific inside radius I made a form tool for the areas I wanted curved. Worried about making marks on that fragile finished surface I thought using the form tool would be alot safer than using a hand graver...
DSCN9010.JPG
DSCN9010.JPG (200.38 KiB) Viewed 31886 times


Also, using the form tool allowed me to be more precise when putting a curve towards the finished area....and...no matter how that form tool is ground, round, oval, square, crooked, oblong ect...ect...they will all be the same when done. :D
Have a great day, William
User avatar
willofiam
 
Posts: 1435
Joined: Fri Feb 10, 2012 5:47 pm

Re: Building a Grasshopper Escapement Skeleton Clock

Postby jdp020351 » Fri Dec 30, 2016 9:01 am

Good Morning William.
Let me start out by saying WOW!
I purchased the same book by W.R. Smith in 2005 and after reading it 20,000 times :lol: from cover to cover. I was completely intimidated, and still am to this very day. I have a lathe but no milling machine ( still don't ) I continued working on clocks and pocket watches that I learned from Bob's course. Then several years later I came across a software program that featured cutting a brass gear on a CNC machine. So I set out to build a cnc machine and when it was completed I still had no confidence to jump in with both feet so I started machining wooden gears (so much better with the cnc, than band saw)

I am excited to watch your progress (no pressure. Right)
Thank you for my renewed interest in building a metal clock

Grateful your thread (post)
Jerry
Attachments
WIN_20161230_09_33_34_Pro.jpg
WIN_20161230_09_33_34_Pro.jpg (42.98 KiB) Viewed 31873 times
jdp020351
 
Posts: 42
Joined: Sun Jul 11, 2010 8:21 am

Re: Building a Grasshopper Escapement Skeleton Clock

Postby willofiam » Mon Jan 02, 2017 11:16 am

Have a great day, William
User avatar
willofiam
 
Posts: 1435
Joined: Fri Feb 10, 2012 5:47 pm

Re: Building a Grasshopper Escapement Skeleton Clock

Postby brianw » Mon Jan 02, 2017 4:14 pm

Good luck with this project William. I will be watching from across the pond with great interest. This is the clock that I would love to build...
User avatar
brianw
 
Posts: 109
Joined: Thu Nov 28, 2013 7:22 am
Location: UK

Re: Building a Grasshopper Escapement Skeleton Clock

Postby willofiam » Mon Jan 02, 2017 5:45 pm

Thanks Brian. Just found this photo :roll: loose my head if it wasnt attached..
DSCN9011.JPG
DSCN9011.JPG (204.69 KiB) Viewed 31848 times
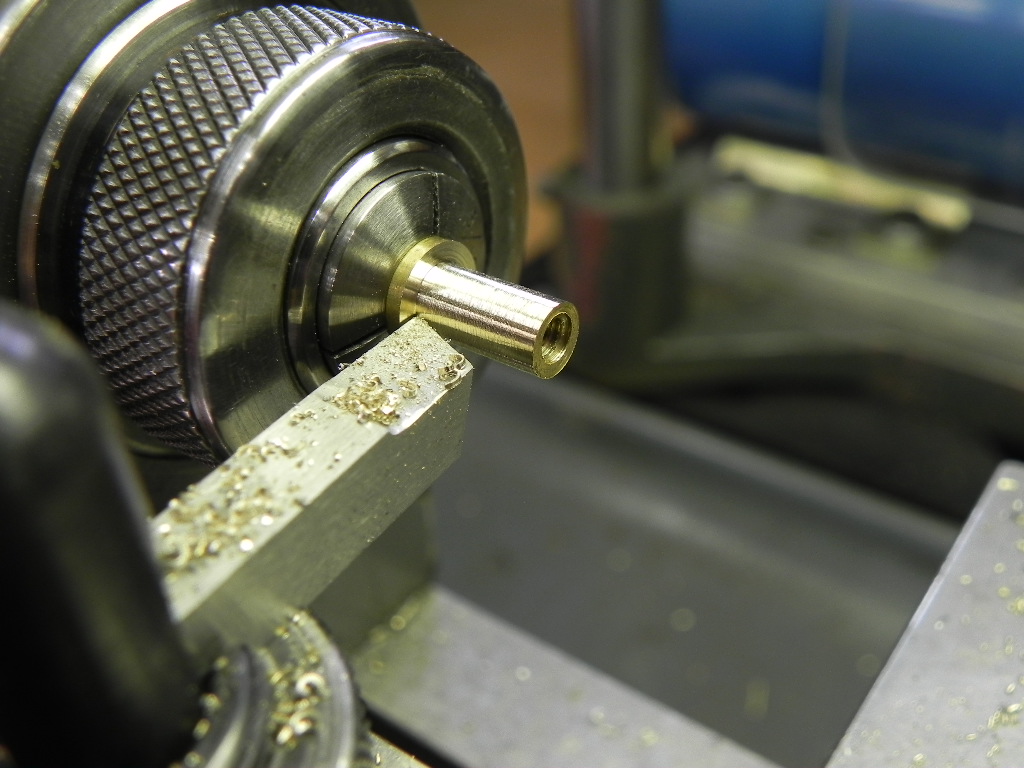
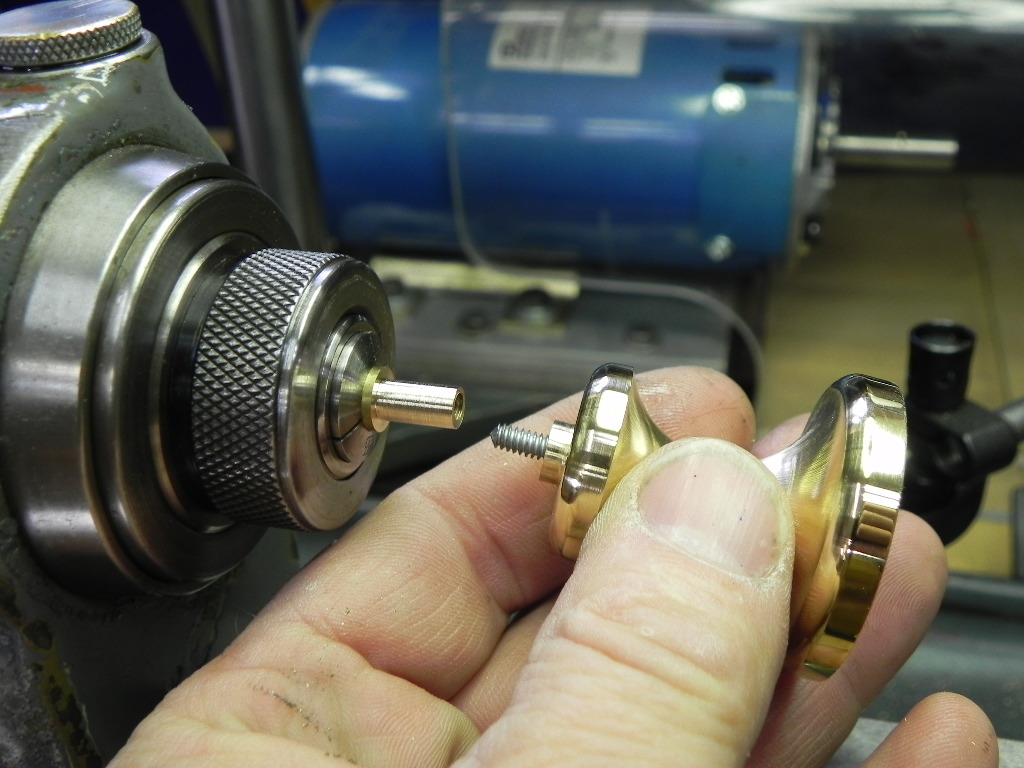
Being rather excited to see some finished product I spent some time polishing the pillars and feet. Since then I have decided to hold off on the final polishing of parts until the very end, focusing on fit and function for now. Here is how I set up for polishing the feet and pillars. Since they have a 8-32 threaded hole for mounting and I didnt want to hold anything that could possibly get damaged I made a short spigot with a threaded hole.
DSCN9034.JPG
DSCN9034.JPG (216.78 KiB) Viewed 31848 times
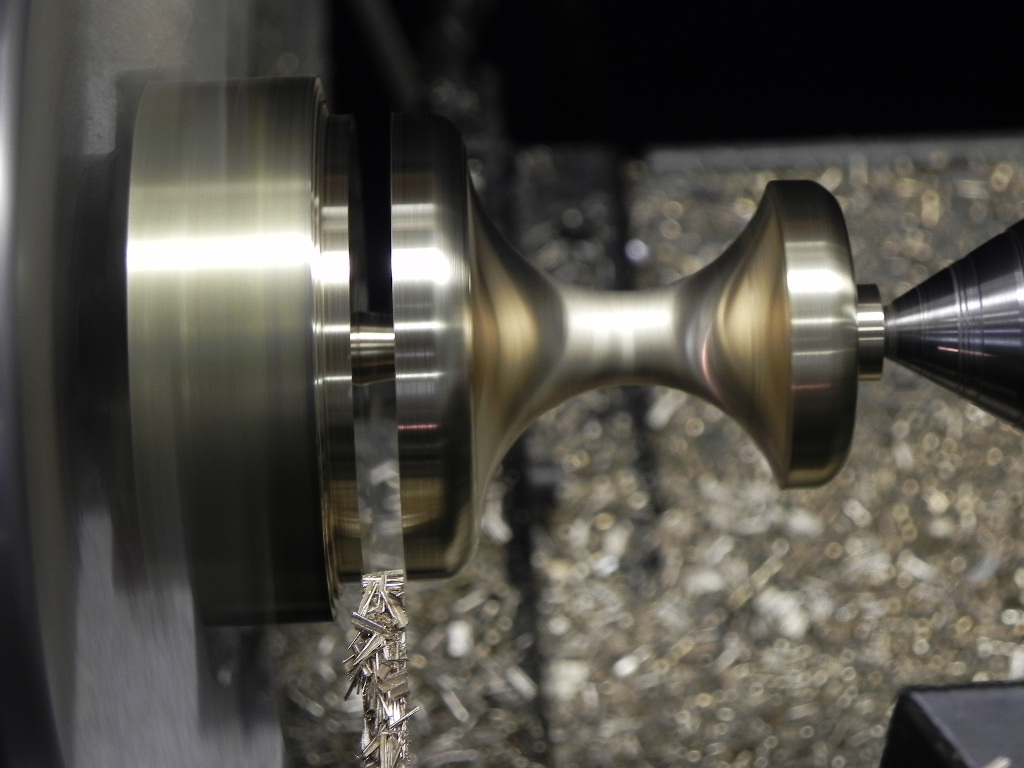
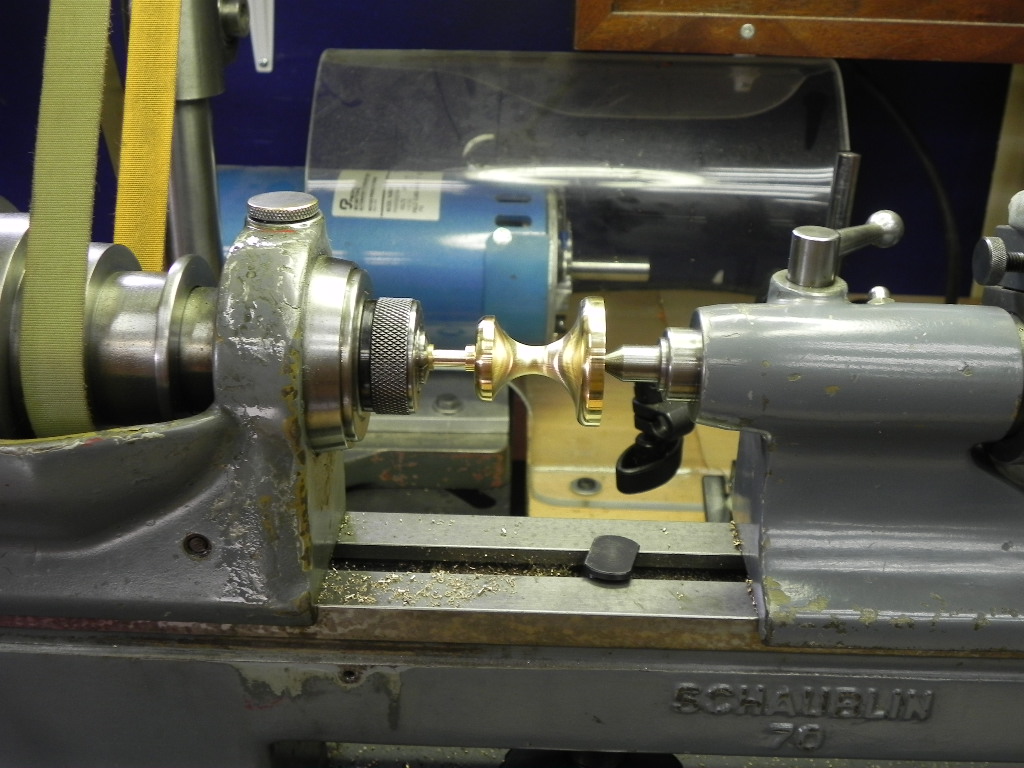
Using the smaller lathe (Schaublin 70) finding it easier to maneuver around and my microscope swings over it for close up inspection, now that can be a issue....not sure of the magnification I get from my microscope..all I know is it came out of a operating room and gets me REAL close to what I am working on, the issue??? every tiny detail is largely enhanced and I really dont think it is possible to get a flawless surface....after hours of trying I found a perfect surface to be a exercise in futility :( Anyway, using a threaded rod I was able to safely mount the pillars and feet in the lathe for the polishing stage.
DSCN9035.JPG
DSCN9035.JPG (221.81 KiB) Viewed 31848 times
DSCN9036.JPG
DSCN9036.JPG (223.23 KiB) Viewed 31848 times
Using progressively finer grits of sandpaper, wood sticks, polish, rags, and everything else in the shop .....I had to end the madness before I lost ALL my hair :shock: and be satisfied...
Have a great day, William
User avatar
willofiam
 
Posts: 1435
Joined: Fri Feb 10, 2012 5:47 pm

Re: Building a Grasshopper Escapement Skeleton Clock

Postby jdp020351 » Mon Jan 02, 2017 6:38 pm

Thanks William
i'm actually in the middle of building a larger CNC. I got the rest of the parts needed to finish for Christmas (I must've been a good boy :lol: )
When finished, I'll send off a photo of both.

Thanks for your response
Jerry
jdp020351
 
Posts: 42
Joined: Sun Jul 11, 2010 8:21 am

Re: Building a Grasshopper Escapement Skeleton Clock

Postby willofiam » Thu Jan 05, 2017 11:47 am

After the initial polishing a thin coat of lacquer to prevent scratches and fingerprints. To hang the parts I used threaded rod, made a hook,
DSCN9040.JPG
DSCN9040.JPG (207.58 KiB) Viewed 31831 times
DSCN9041.JPG
DSCN9041.JPG (212.78 KiB) Viewed 31831 times
then dipped into the lacquer. I thinned the lacquer to approximately 2 to 1 lacquer to thinner and warmed up the brass pieces in my dryer box before dipping. This helped in reducing "globs" of finish in certain areas.
DSCN9042.JPG
DSCN9042.JPG (217.62 KiB) Viewed 31831 times
DSCN9043.JPG
DSCN9043.JPG (201.16 KiB) Viewed 31831 times
Have a great day, William
User avatar
willofiam
 
Posts: 1435
Joined: Fri Feb 10, 2012 5:47 pm

Re: Building a Grasshopper Escapement Skeleton Clock

Postby willofiam » Thu Jan 05, 2017 11:49 am

DSCN9044.JPG
DSCN9044.JPG (227.83 KiB) Viewed 31831 times
DSCN9045.JPG
DSCN9045.JPG (231.25 KiB) Viewed 31831 times
DSCN9046.JPG
DSCN9046.JPG (229.97 KiB) Viewed 31831 times
DSCN9047.JPG
DSCN9047.JPG (220.95 KiB) Viewed 31831 times
Have a great day, William
User avatar
willofiam
 
Posts: 1435
Joined: Fri Feb 10, 2012 5:47 pm

Re: Building a Grasshopper Escapement Skeleton Clock

Postby willofiam » Thu Jan 05, 2017 11:54 am

DSCN9050.JPG
DSCN9050.JPG (211.77 KiB) Viewed 31831 times
DSCN9052.JPG
DSCN9052.JPG (213.58 KiB) Viewed 31831 times
DSCN9049.JPG
DSCN9049.JPG (225.92 KiB) Viewed 31831 times
Have a great day, William
User avatar
willofiam
 
Posts: 1435
Joined: Fri Feb 10, 2012 5:47 pm

Re: Building a Grasshopper Escapement Skeleton Clock

Postby willofiam » Thu Jan 05, 2017 12:35 pm

Next is making the barrel.
DSCN9157.JPG
Indicating in a c360 brass round tube in the 4 jaw chuck. Boring the inside diameter first.
DSCN9157.JPG (220 KiB) Viewed 31829 times
DSCN9161.JPG
Must be careful not to run into the chuck. The piece is left a little long to allow stopping before going all the way thru.
DSCN9161.JPG (204.38 KiB) Viewed 31829 times
DSCN9159.JPG
This is a picture of a stop I have set up for the carriage.....just in case I forget...
DSCN9159.JPG (213.89 KiB) Viewed 31829 times
Nothing better than making a mess ;)
DSCN9162.JPG
Now the outside can be cleaned off. This ended up being a mute point since I ended up doing a cleanup cut on the outer surface later after I set the mainspring hook.
DSCN9162.JPG (216.81 KiB) Viewed 31829 times
Have a great day, William
User avatar
willofiam
 
Posts: 1435
Joined: Fri Feb 10, 2012 5:47 pm

Re: Building a Grasshopper Escapement Skeleton Clock

Postby willofiam » Thu Jan 05, 2017 1:05 pm

I must have been a bit excited to keep moving along since I cannot find any photos of making the barrel caps. Here I have a quick set up on the mill of the mainspring barrel. This setup was only for indexing the holes for the barrel cap screws. Simply a threaded rod very close to the size of the arbor holes...and sandwich it all together. They are size o-80, flat head, steel, straight slot screws, that I bought, polished and blued for the caps.
DSCN9163.JPG
DSCN9163.JPG (235 KiB) Viewed 31829 times


Once the barrel caps were drilled and threaded and everything was looking good it was time to put in the mainspring hook. The process here is to drill and thread a hole in the center of the barrel, screw in a mild steel flat head screw from the inside, apply high strength loctite or similar, cut off the excess, carefully hammer it over, then file down to form a relief on the trailing edge.
DSCN9168.JPG
Using the die filer.
DSCN9168.JPG (196.75 KiB) Viewed 31829 times
DSCN9175.JPG
Finished hook
DSCN9175.JPG (207.34 KiB) Viewed 31829 times
DSCN9169.JPG
Here I did the final cleanup cut to the outer diameter of the barrel.
DSCN9169.JPG (195.39 KiB) Viewed 31829 times
Have a great day, William
User avatar
willofiam
 
Posts: 1435
Joined: Fri Feb 10, 2012 5:47 pm

Re: Building a Grasshopper Escapement Skeleton Clock

Postby brianw » Tue Jan 10, 2017 3:06 pm

Keep going William. Great work.
I look forward to the day when I have enough equipment to replicate your efforts.
User avatar
brianw
 
Posts: 109
Joined: Thu Nov 28, 2013 7:22 am
Location: UK

Re: Building a Grasshopper Escapement Skeleton Clock

Postby willofiam » Wed Jan 18, 2017 8:34 pm

Hey Brian, thanks, always nice to hear from you :D . Well I must have been movin along since I have missed some photo taking. Time for the mainspring barrel arbor, made to size according to the instructions. I had mounted the arbor in the dividing head with a 2 degree tilt for a tapered winding square then did some final sizing. Once I was happy about that I used the spin indexer to locate, drill and tap a hole for a screw that would be the arbor hook. I had decided to use O-1 tool steel instead of a regular screw, I guess I figured it would be much stronger. Simply put a taper on some round stock and threaded the end.
DSCN9164.JPG
DSCN9164.JPG (202.56 KiB) Viewed 31767 times
DSCN9165.JPG
DSCN9165.JPG (216.18 KiB) Viewed 31767 times
DSCN9166.JPG
DSCN9166.JPG (210.7 KiB) Viewed 31767 times
DSCN9171.JPG
DSCN9171.JPG (193.76 KiB) Viewed 31767 times
Have a great day, William
User avatar
willofiam
 
Posts: 1435
Joined: Fri Feb 10, 2012 5:47 pm

Next

Return to NEW!!! The CLOCKMAKERS Forum - Designing, Building & Parts Fabrication

Who is online

Users browsing this forum: No registered users and 2 guests